toolforest.io Documentation
Getting Started
Introduction
toolforest.io is a consumer-focused MCP (Model Context Protocol) aggregator that makes it simple to connect your AI assistants and LLMs to the apps and APIs you use every day.
Instead of configuring multiple MCP servers and managing different connections, toolforest.io provides a single, unified endpoint where you can mix and match the exact tools you need.
Key Features
- Single Endpoint - One MCP connection for all your tools
- Mix & Match - Choose only the tools you need from a growing collection
- Secure Authentication - Industry-standard OAuth integration with major platforms
- Privacy First - Your data stays yours, no permanent storage
- LLM Optimized - Built specifically for AI assistants like ChatGPT, Claude, Grok, Manus, OpenClaw, Perplexity, and Vibe
Quick Start
Get started with toolforest.io in just a few minutes:
1. Create an Account
Sign up at www.toolforest.io using your email account.
2. Login and Create an MCP Server Endpoint
Create an MCP server endpoint specific to your LLM client (e.g., Claude or ChatGPT).
3. Configure your toolkits.
Choose which toolkits you want to use and, where relevant, connect them to your external accounts (e.g., Google Sheets or Fitbit).
4. Connect Your LLM to toolforest.io
Add the toolforest.io MCP endpoint to your AI assistant's configuration and connect via OAuth 2.0. You can also connect your agent directly to toolforest.io via MCP with an API Key.
Core Concepts
MCP Overview
The Model Context Protocol (MCP) is an open protocol that standardizes how AI assistants connect to external tools and data sources. Think of it as a universal adapter that lets your LLM talk to different apps and services.
toolforest.io implements MCP to provide a seamless bridge between your AI assistant and the tools you use every day. When you connect to toolforest.io, your LLM gains access to all your authorized tools through a single, secure connection.
How It Works
- Your LLM connects to the toolforest.io MCP server
- You authorize access to specific services (Google, Microsoft, etc.)
- Your LLM discovers tools available through your connections
- You interact naturally - ask your LLM to perform tasks using your tools
- toolforest.io handles authentication, API calls, and data formatting
Authentication
toolforest.io uses industry-standard OAuth 2.0 authentication to connect to third-party services. This means:
- You control exactly what permissions you grant
- You can revoke access at any time
- We never see your passwords
- Tokens are encrypted and stored securely
Connecting Your AI Assistants
- Log into your toolforest.io account
- Configure at least one MCP server with at least one toolkit
- Have a ChatGPT, Claude, Grok, Manus, Perplexity, or Vibe account
Perplexity requires a paid plan for custom MCP connectors. If you don't have one, you could try ChatGPT, Claude, or Vibe instead — all three support MCP connectors on their free plans.
ChatGPT
Available on: Web, Mobile (iOS/Android)
Follow these steps to add the Toolforest MCP Connector to ChatGPT and enable your ChatGPT assistant to access your Toolforest tools.
Setup Steps
Toggle Developer mode ON if it isn't already.
Click Back to return to the Apps screen.
Click Create (or New connector) to start adding a new connector.
In Name, enter:
Toolforest(Optional) In Description, enter something like:
Connects ChatGPT to ToolforestIn MCP Server URL, enter:
https://mcp.toolforest.io/mcpIn Authentication, confirm that OAuth is selected (it should be the default).
Review the custom server warning and check the box: "I understand and want to continue."
Beta Notice: This warning appears because Toolforest is currently in beta and custom MCP servers are unverified by OpenAI. We're working toward formal verification to streamline this process.
Click Create. You'll see a brief loading screen while ChatGPT establishes a connection with Toolforest.
If you aren't already logged into the toolforest.io portal, you'll be redirected to the Toolforest login screen. Sign in with your Toolforest account.
After logging in, Toolforest will ask you to grant ChatGPT permission to access your tools. Click Approve.
After a few seconds, you'll be redirected back to the ChatGPT Apps screen. You should see a confirmation that Toolforest has been connected.
You can now use your Toolforest-powered tools directly from ChatGPT.
Mobile (iOS / Android)
Connecting Toolforest via the web automatically makes your tools available in the ChatGPT mobile app. No additional setup is needed.
Adding Tools to a Chat
Follow the steps below to make your toolkits available to a chat.
Steps
Click on the + icon on the bottom left part of the chat window.
Select Toolforest from the menu.
A Toolforest indicator should appear underneath the chat window, indicating that Toolforest is connected to the chat.
Claude
Available on: Web, Mobile (iOS/Android), Desktop (Cowork), Claude Code
Follow these steps to add the Toolforest MCP Connector to Claude.
Setup Steps
Open the Connectors settings:
- Web (claude.ai): Go to https://claude.ai/customize/connectors
- Desktop App (Cowork): Open the app menu → Settings → Connectors
Click the + icon at the top of the screen to bring up the Add Custom Connector dialog.
In the Name field, enter:
ToolforestIn the Remote MCP server URL field, enter:
https://mcp.toolforest.io/mcpClick Add to save the configuration.
Select Toolforest from the list of connectors and click the Connect button that appears on the right side of the screen.
You will be redirected to the Toolforest authorization page. Click Approve.
You will be redirected back to Claude settings with a success message. You should now see your connected tools on the screen.
Mobile (iOS / Android)
Connecting Toolforest via the Web or Desktop App (Cowork) automatically makes your tools available in the Claude mobile app. No additional setup is needed.
Claude Code (Terminal and Web)
Connecting Toolforest via the Web or Desktop App (Cowork) automatically makes your tools available in Claude Code via MCP. No additional setup is needed.
Generic LLM Agent
Available on: CLI / Self-hosted agents
Follow these steps to connect your custom LLM agent or application to Toolforest and give it access to your configured toolkits.
Setup Steps
Log in to toolforest.io and select your MCP server from the sidebar, or create a new one for your agent.
Click the Connect tab in the top right corner.
Under IP Allowlist, enter the source IP address of the machine where your agent runs and click Add. You can find your current IP by running
curl ifconfig.me. If your machine uses IPv6, add that address as well.Click + Generate New API Key. Give the key a descriptive name (e.g.
"my-langchain-agent") and click Generate.Copy the key immediately — it will only be shown once. The key starts with
tfo_.Verify your key works by listing the available tools:
curl -X POST https://mcp.toolforest.io/mcp \
  -H "Authorization: Bearer tfo_your_key_here" \
  -H "Content-Type: application/json" \
  -d '{"jsonrpc":"2.0","method":"tools/list","id":1}'
You should see a JSON response listing your enabled toolkits. If you get a 401 or 403 error, double-check your API key and IP allowlist.
Connect to Your Agent
Any MCP-compatible framework can connect to Toolforest by pointing at https://mcp.toolforest.io/mcp with your API key as a bearer token.
Step 1 — Install the adapter
pip install langchain-mcp-adapters langgraphStep 2 — Connect and load tools
# Connect any LangChain / LangGraph agent to Toolforest
from langchain_mcp_adapters.client import MultiServerMCPClient
from langchain.agents import create_agent

client = MultiServerMCPClient({
    "toolforest": {
        "url": "https://mcp.toolforest.io/mcp",
        "transport": "http",
        "headers": {"Authorization": "Bearer tfo_your_key_here"}
    }
})

tools = await client.get_tools()
agent = create_agent("openai:gpt-4.1", tools)
response = await agent.ainvoke({"messages": "Summarize my last 5 emails"})
Step 1 — Install dependencies
pip install llama-index llama-index-tools-mcpStep 2 — Connect and load tools
from llama_index.tools.mcp import MCPToolSpec
from llama_index.agent.openai import OpenAIAgent

mcp_spec = MCPToolSpec(
    server_url="https://mcp.toolforest.io/mcp",
    headers={"Authorization": "Bearer tfo_your_key_here"}
)

tools = mcp_spec.to_tool_list()
agent = OpenAIAgent.from_tools(tools)
response = agent.chat("What's on my calendar tomorrow?")
Step 1 — Install the SDK
pip install openai-agentsStep 2 — Connect and load tools
from agents import Agent, Runner
from agents.mcp import MCPServerStreamableHttp

server = MCPServerStreamableHttp(
    url="https://mcp.toolforest.io/mcp",
    headers={"Authorization": "Bearer tfo_your_key_here"}
)

agent = Agent(
    name="My Toolforest Agent",
    instructions="You are a helpful assistant with access to my tools.",
    mcp_servers=[server]
)

async with server:
    result = await Runner.run(agent, "Create a task for my meeting tomorrow")
Step 1 — Install the MCP SDK
pip install mcpStep 2 — Connect and list tools
from mcp.client.streamable_http import streamablehttp_client
from mcp import ClientSession

async with streamablehttp_client(
    url="https://mcp.toolforest.io/mcp",
    headers={"Authorization": "Bearer tfo_your_key_here"}
) as (read, write, _):
    async with ClientSession(read, write) as session:
        await session.initialize()
        tools = await session.list_tools()
        print(tools)  # your enabled Toolforest tools
Any MCP-compatible client can connect to Toolforest using:
MCP Server URL  : https://mcp.toolforest.io/mcp
Transport       : Streamable HTTP
Auth header     : Authorization: Bearer tfo_your_key_here
Refer to your framework's MCP documentation for how to pass custom headers to a remote HTTP MCP server.
Grok
Available on: Web
Follow these steps to connect Toolforest to Grok.
Setup Steps
Click New Connector.
Click + Custom.
In Name, enter:
ToolforestIn Server URL, enter:
https://mcp.toolforest.io/mcpClick Add Connector.
If you're not already signed in, log into your Toolforest account.
Click Approve to grant Grok permission to access your tools.
You'll be redirected back to Grok. Toolforest should now appear in your connectors.
Manus
Available on: Web
Follow these steps to connect Toolforest to Manus.
Setup Steps
In Manus, open the profile menu and go to Settings.
Open My plugins, then Connectors.
Click Add connectors, then choose Custom MCP.
In Create, choose Custom MCP.
In Server Name, enter:
ToolforestIn Transport Type, choose HTTP.
In Note, enter:
Use Toolforest to access connected apps and APIs.In Server URL, enter:
https://mcp.toolforest.io/mcpClick Save.
To authenticate Toolforest, open the new Toolforest connector and click Try it out.
Submit Manus's prefilled test prompt.
When Manus shows the Toolforest card with Please login to use this connector, click Log in.
Review the Toolforest authorization request and click Approve.
Return to Manus. The Toolforest card should show Login successful.
No custom headers are required.
Note: Manus currently creates the custom MCP connector directly after saving, then defers OAuth until the connector is first used.
OpenClaw
Available on: CLI / Self-hosted agents
Follow these steps to connect your OpenClaw agents to Toolforest and give them access to your configured toolkits.
Setup Steps
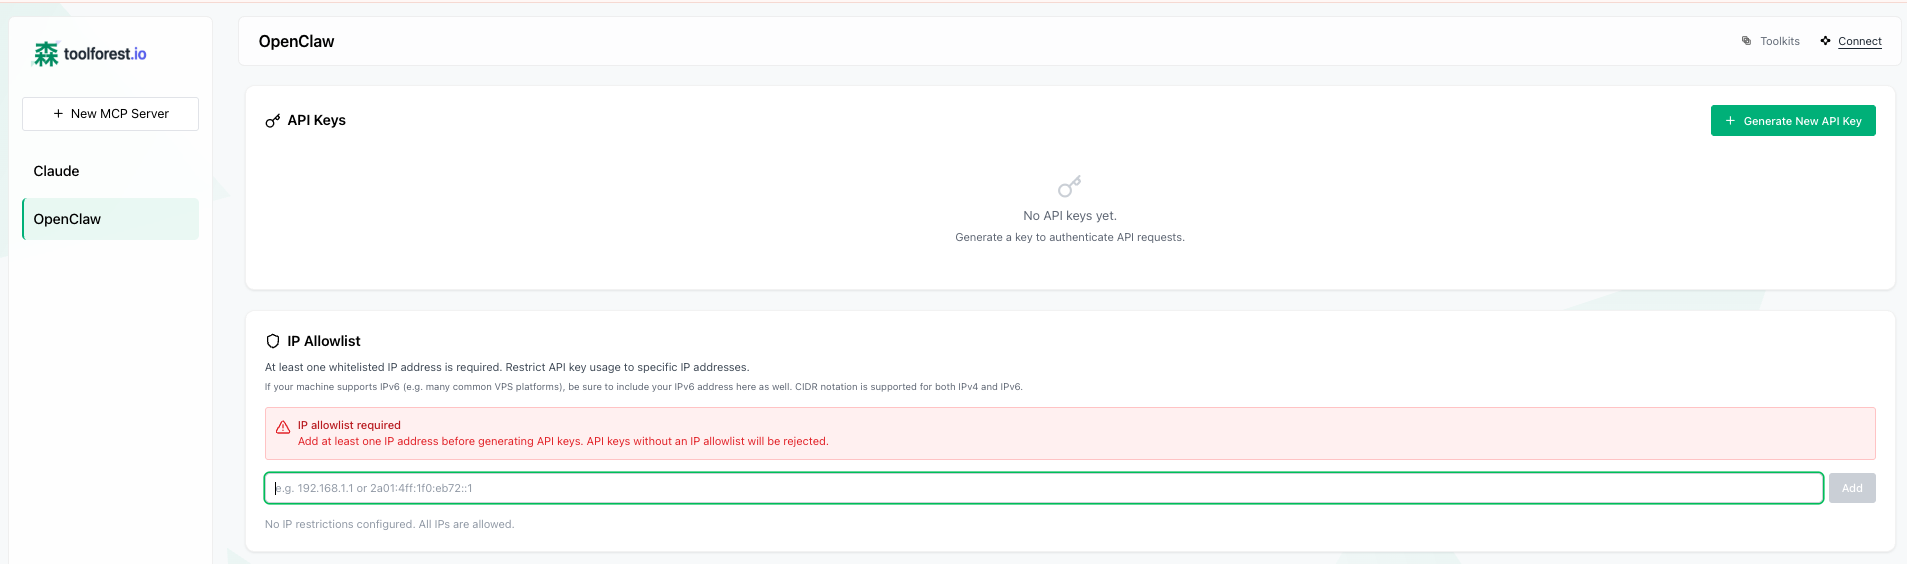
Log in to toolforest.io and select your OpenClaw MCP server from the sidebar.
Click the Connect tab in the top right corner.
Under IP Allowlist, enter the source IP address of your OpenClaw instance (the machine where your agent runs) and click Add. You can find your current IP by running
curl ifconfig.me. If your machine uses IPv6, add that address as well.Click + Generate New API Key. Give the key a descriptive name (e.g. "my-openclaw-agent") and click Generate.
Copy the key immediately — it will only be shown once. The key starts with
tfo_.Verify your key works by listing the available tools:
curl -X POST https://mcp.toolforest.io/mcp \
  -H "Authorization: Bearer tfo_your_key_here" \
  -H "Content-Type: application/json" \
  -d '{"jsonrpc":"2.0","method":"tools/list","id":1}'
You should see a JSON response listing your enabled toolkits. If you get a 401 or 403 error, double-check your API key and IP allowlist.
Connect to OpenClaw
Method 1: CLI Install (Recommended)
Use this if you have terminal access to the machine running OpenClaw.
Step 1 — Install the plugin
openclaw plugins install @toolforest/toolforest-plugin@latest
Step 2 — Set your API key
Use the API key you generated in the steps above.
openclaw config set plugins.entries.toolforest.config.apiKey "tfo_your_key_here"
Step 3 — Make tools available on all profiles
Warning: Do not use
openclaw config set tools.alsoAllow '["toolforest"]'— that replaces the entire list and removes any other plugins you have configured. Use the append command below instead.
existing=$(openclaw config get tools.alsoAllow 2>/dev/null || echo '[]')
openclaw config set tools.alsoAllow "$(node -e "const v=JSON.parse('$existing'); if(!v.includes('toolforest'))v.push('toolforest'); console.log(JSON.stringify(v))")"
Step 4 — Restart the gateway
openclaw gateway restart
Note: In some environments the restart process gets killed when the gateway shuts down. If the agent becomes unresponsive after this step, restart the gateway manually (e.g.
openclaw gateway start).
Step 5 — Verify
openclaw plugins inspect toolforest
You should see: toolforest: Registered 4 meta-tools
Method 2: Agent-Assisted Install
Use this if you prefer to let your OpenClaw agent handle the setup. Results may vary depending on your LLM.
Send this message to your OpenClaw agent:
Set up the Toolforest plugin for OpenClaw. My API key is: tfo_your_key_here.
Read the setup instructions from https://registry.npmjs.org/@toolforest/toolforest-plugin
and follow them exactly.
Replace
tfo_your_key_herewith the API key you generated in the steps above.
The agent will install the plugin, configure your API key, and restart the gateway. If it gets stuck, use Method 1.
Troubleshooting
- Check that your API key is correct and active. You can regenerate it from the dashboard if needed.
- Verify your current IP matches an entry in the IP Allowlist section. If you're behind a VPN or proxy, add that IP as well. Run
curl ifconfig.meto check your current IP. - Enable the required service (e.g. Gmail, Google Calendar) in your Toolforest dashboard under Toolkits.
- If the gateway becomes unresponsive after installation, try restarting it manually with
openclaw gateway start.
Perplexity
Available on: Web, Mobile (iOS/Android)
Follow these steps to connect Toolforest to Perplexity.
Setup Steps
Click + Custom Connector to start adding a new connector.
In Name, enter:
ToolforestIn MCP Server URL, enter:
https://mcp.toolforest.io/mcpCheck the box for I understand custom connectors can introduce risks.
Click Add to register the connector.
You'll be returned to the Connectors screen.
Open the Connector categories dropdown and choose Custom. Your Toolforest connector won't appear in the default category list.
Click on Toolforest in the Custom category. You'll be redirected to the Toolforest authorization page.
If you're not already signed in, log into your Toolforest account.
Click Approve to grant Perplexity permission to access your tools.
You'll be redirected back to Perplexity. A confirmation screen reading Authentication Successful indicates the connection is active.
Mobile (iOS / Android)
Connecting Toolforest via the web automatically makes your tools available in the Perplexity mobile app. No additional setup is needed.
Adding Tools to a Chat
Follow the steps below to make your toolkits available to a chat.
Steps
Click on the + icon on the bottom left part of the chat window.
Select Toolforest from the Connectors and Sources menu.
A Toolforest indicator should appear underneath the chat window, indicating that Toolforest is connected to the chat.
Vibe (LeChat)
Available on: Web, Mobile (iOS/Android)
Follow these steps to connect Toolforest to Vibe.
Setup Steps
Click the + Add Connector button in the top right corner.
In the popup window, switch to the Custom MCP Connector tab.
In Connector Name, enter:
ToolforestIn Connector Server, enter:
https://mcp.toolforest.io/mcp(Optional) Add a description.
In Authentication Method, select OAuth2.1 if it's not already selected.
Click Connect.
You will be redirected to the Toolforest authorization page. Click Approve.
Once redirected back to Vibe, scroll down to the Connectors list to confirm that Toolforest is active (indicated by a green status light).
Mobile (iOS / Android)
Connecting Toolforest via the web automatically makes your tools available in the Vibe mobile app. No additional setup is needed.
Adding Tools to a Chat
Follow the steps below to make your toolkits available to a chat.
Steps
Click on the + icon on the bottom left part of the chat window.
Select Toolforest from the menu.
A Toolforest indicator should appear underneath the chat window, indicating that Toolforest is connected to the chat.
Toolkits
Browse our growing collection of toolkits. Click any toolkit to view setup instructions and full capabilities.
Google Workspace
Google Docs
Create, edit, and manage documents with comprehensive section-based editing and rich text formatting.
Google Sheets
Automate and manage spreadsheets with comprehensive data manipulation, formatting, and analysis.
Google Slides
Create, edit, and manage professional presentations with full control over slides, content, and styling.
Gmail
Read, search, and send emails with AI assistance. Manage drafts, organize with labels, and handle attachments.
Google Calendar
Manage your calendar with AI assistance. View, create, and organize events, check availability, and RSVP to invitations.
Google Tasks
Create, organize, and manage to-do lists with due dates, subtasks, and progress tracking.
Health & Fitness
My Fitbit Data
Access health and fitness data with daily summaries, intraday tracking, trend analysis, and anomaly detection.
Ōura Ring
Access sleep, activity, and readiness data with daily summaries, intraday tracking, trend analysis, and anomaly detection.
My Google Health Data (Beta)
Access sleep, exercise, recovery, and Fitbit tracker metrics through Google's Health API.
Prediction Markets
Social
Music
ListenBrainz
Sync listening history from Spotify and other services, explore your music taste, and get personalized recommendations.
MusicBrainz
Resolve canonical MusicBrainz identifiers and read artist, recording, release, credit, tag, relationship, and link metadata.
Last.fm
Explore listening history, top charts, genre tags, and similar listeners on Last.fm.
Apple Music
Get listening data, discover new music, and create custom playlists with AI assistance.
Learning
FAQ
What is MCP?
MCP (Model Context Protocol) is an open protocol that standardizes how AI assistants connect to external tools and data sources. It was created by Anthropic and is supported by many LLM providers.
Do you store my data?
No. toolforest.io acts as a secure bridge between your LLM and your connected services. We don't permanently store your documents, emails, or other data. Data passes through our servers only for the duration of each operation and is immediately discarded.
Can I revoke access?
Yes! You can revoke access to any connected service at any time from your dashboard. You can also revoke access directly from the service provider (e.g., Google Account settings).
Which LLMs are supported?
toolforest.io can work with any LLM chatbot or agent that supports the Model Context Protocol.
Can I request new integrations?
Absolutely! Submit a feature request and let us know what you'd like to see.